
こんにちは、見出しのカスタマイズが中々進まないAmyです。
このブログのWordPressテーマ『ハミングバード』の見出し、デフォルトのまま使用するにはちょっと残念な見た目です。何とか変えたいといじってみても、なかなか言うことを聞いてくれない。今まで使っていたテーマではコピペするだけでOKだったのに・・・。なんて思っているのは、私だけではないはず。『STORK』、『ALBATROS』でも多分使えるかもしれないコードを紹介します。
カスタマイズの前に
- 『ハミングバード』子テーマの有効化を確認してください。
子テーマはこちらの公式サイトからダウンロード出来ます。
インストールからの基本設定はこちらの記事で解説しています。 - 「ダッシュボード」→「外観」→「カスタマイズ」→「投稿・固定ページ設定」→「見出し(H2)デザイン」シンプルを選択します。
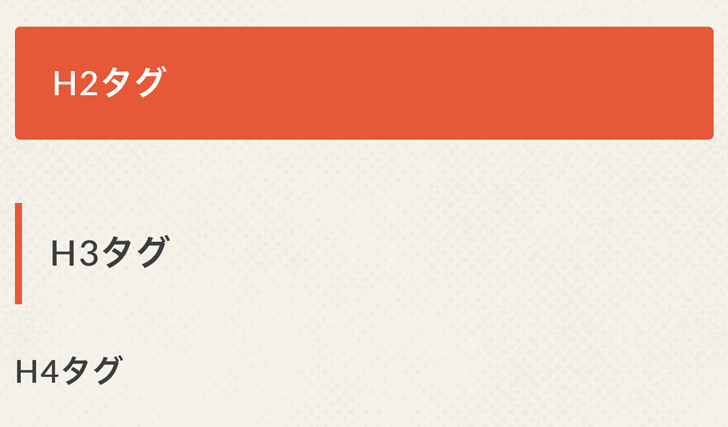
『ハミングバード』のデフォルトの見出し
H2はまだいいとして、ステッチやH3とH4をデフォルトのままでは野暮ったい気がします。(個人の感想です)
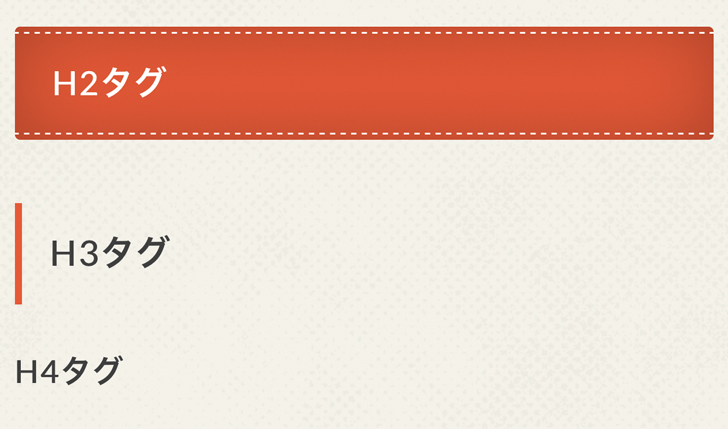
デフォルトのH2見出しCSSコード(ステッチ無シンプル)
[css] .entry-content h2{position: relative;
border: none;
font-size:1.25em;
padding: 1em 1.1em;
margin-top: 2.1em;
margin-bottom: 1em;
-webkit-border-radius: 3px;
-moz-border-radius: 3px;
border-radius: 3px;
background: #e55937;
color:#fff;
box-shadow: 0 0 45px rgba(0, 0, 0, 0.25) inset;
}
[/css]
デフォルトのH3見出しCSSコード
[css] .entry-content h3{border-left:4px solid;
padding: .7em 0 .7em .8em;
margin-top: 1.8em;
}
[/css]
公式で公開されているコード(親テーマのstyle.css)を元に修正し、自分の好みの見出しに仕上げて行くのが一番確実かもしれません。他所で公開されている見出しのCSSをそのままコピペしても、上手く表示されないのは親テーマのCSSに記述されたコードが活きているからです。そのため、H2ではコピペだけでは『吹き出し』の見出しは出来ません、H3は左のボーダーが残ったままだったりします。親テーマのStyle.cssのコードを見れば、何が邪魔をしているのかわかります。
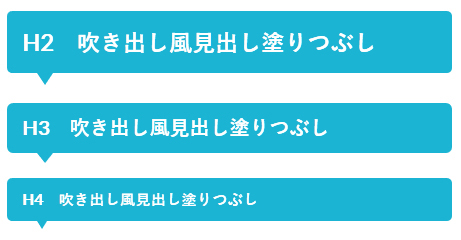
吹き出し風見出し 背景色有
見出しの変更のCSSコードは、必ず「ダッシュボード」→「外観」→「カスタマイズ」→「追加CSS」に追加してください。
このブログと同じ吹き出し風の見出しです。H2~H4順番に小さくなっています。
H2のコード
[css] .entry-content h2{position: relative;
background: #1BB4D3;
color:#fff;
font-size: 1.5em;
border-radius: 5px;
margin-top: 40px;
margin-bottom: 25px;
padding: 15px 15px;
}
.entry-content h2:after{
position: absolute;
content: ” !important;
top: 100%;
left: 30px;
border: 8px solid transparent;
border-top: 10px solid #1BB4D3;
width: 0;
height: 0;
}
[/css]
H2のコードを例にカスタマイズの詳細を説明します。
.entry-content h2・・・投稿記事中のH2 h2だけの記述ではサイドバーやウィジェットなどに影響が出る可能性があります。
背景色の変更・・・3行目と17行目の二ヶ所を#1BB4D3からお好きな色に変更してください。
文字色の変更・・・color 4行目。
フォントサイズ・・・font-size 5行目。
角丸・・・border-radius 6行目。
タグの上下のマージン・・・margin-top 7行目、margin-bottom 8行目。
内側の余白・・・padding 9行目。
11行目からは、吹き出しの三角形の設定です。
13行目の『!important』がポイントです。これがないと三角部分は表示されないのでお忘れなく!
吹き出しの三角の横幅・・・border 16行目。
吹き出しの三角の縦幅・・・border-top 17行目。
H3のコード
[css] .entry-content h3 {position: relative;
background: #1BB4D3;
color:#fff;
font-size: 1.3em;
padding: .5em .75em;
border: 0px solid #1BB4D3;
border-radius: 6px;
margin-top: 30px;
margin-bottom: 25px;
}
.entry-content h3:after{
position: absolute;
content: ” !important;
top: 100%;
left: 30px;
border: 8px solid transparent;
border-top: 10px solid #1BB4D3;
width: 0;
height: 0;
}
[/css]
H4のコード
[css] .entry-content h4{position: relative;
background: #1BB4D3;
color:#fff;
font-size: 1.0em;
border-radius: 5px;
margin-top: 20px;
margin-bottom: 20px;
padding: 10px 15px;
}
.entry-content h4:after{
position: absolute;
content: ” !important;
top: 100%;
left: 30px;
border: 5px solid transparent;
border-top: 8px solid #1BB4D3;
width: 0;
height: 0;
}
[/css]
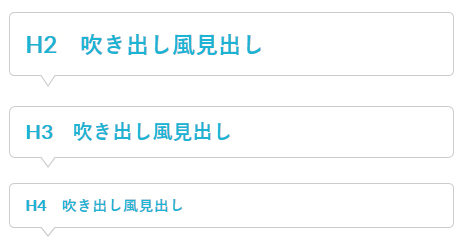
吹き出し風見出し 背景白色
背景色を白にする場合は、色指定の変更だけではないので載せておきます。
H2のコード
H2のコードを例にカスタマイズの詳細を説明します。
背景色の変更・・・3行目と19行目の二ヶ所を#1BB4D3からお好きな色に変更してください。
文字色の変更・・・font-color 4行目。
フォントサイズ・・・font-size 5行目。
角丸・・・border-radius 6行目。
タグの上下のマージン・・・margin-top 8行目、margin-bottom9行目。
内側の余白・・・padding 10行目。
11行目からは、吹き出しの三角形の設定です。
13行目の『!important』がポイントです。これがないと三角部分は表示されないのでお忘れなく!
吹き出しの三角の横幅・・・border 18行目。
吹き出しの三角の縦幅・・・border-top 19、27、28行目。
position: relative;
background: #fff;
color:#1BB4D3;
font-size: 1.5em;
border-radius: 5px;
border: 1px solid #ccc;
margin-top: 40px;
margin-bottom: 25px;
padding: 15px 15px;
}
.entry-content h2::before,
.entry-content h2::after {
position: absolute;
content: ” !important;
top: 100%;
left: 30px;
border: 8px solid transparent;
border-top: 12px solid #1BB4D3;
width: 0;
height: 0;
}
.entry-content h2::before {
border-top: 12px solid #ccc;
}
.entry-content h2::after {
margin-top: -2px;
border-top: 12px solid #fff;
}
[/css]
H3のコード
[css] .entry-content h3 {position: relative;
color: #1BB4D3;
font-size: 1.3em;
padding: .5em .75em;
background-color: #fff;
border: 1px solid #ccc;
border-radius: 6px;
margin-top: 30px;
margin-bottom: 25px;
}
.entry-content h3::before,
.entry-content h3::after {
position: absolute;
top: 100%;
left: 30px;
content: ”;
height: 0;
width: 0;
border: 8px solid transparent;
}
.entry-content h3::before {
border-top: 11px solid #ccc;
}
.entry-content h3::after {
margin-top: -2px;
border-top: 11px solid #fff;
}
[/css]
H4のコード
[css] .entry-content h4{position: relative;
background: #fff;
color:#1BB4D3;
font-size: 1.0em;
border-radius: 5px;
border: 1px solid #ccc;
margin-top: 20px;
margin-bottom: 20px;
padding: 10px 15px;
}
.entry-content h4::before,
.entry-content h4::after {
position: absolute;
content: ” !important;
top: 100%;
left: 30px;
border: 8px solid transparent;
border-top: 12px solid #1BB4D3;
width: 0;
height: 0;
}
.entry-content h4::before {
border-top: 8px solid #ccc;
}
.entry-content h4::after {
margin-top: -2px;
border-top: 8px solid #fff;
}
[/css]
吹き出しの見出しは、以下の記事を参考にさせて頂きました。Special thanks NxWorldさん、サルワカさん